What you got is a glass bottle when you finish drinking your Bloody Mary Mix. Then what will you do to the bottle? Just throw it away? Actually, with a good bottle cutter, you can make it a drinking glass, a flower vase, a candle holder, or even a wind chimes.
AGPtek Bottle Cutter is especially designed for home users. It is easy to install and use. Install the cutter according to the user manual firstly. Then follow the four steps below and you will get what you want.
The four easy steps are: etch, heat, cool and polish.
.
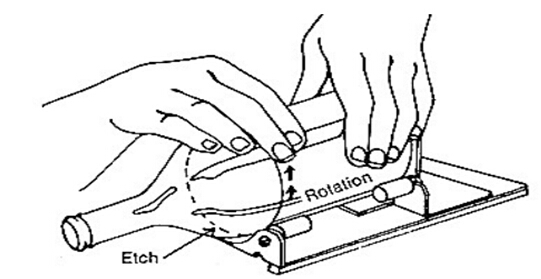
STEP 1: ETCHING A LINE ON THE BOTTLE
This is exactly the same as making a score line when cutting glass. Lay the bottle cutter on the top of your flat table. Place the bottle on the cutter.
Hold the cutter steady with your left hand. Grasp the bottle with your right hand. Turn it against the glass cutter edge in a slow and steady movement. Make sure you complete 1 full rotation, but do not do any more than that. Later you will get a clear cutting line on the bottle.
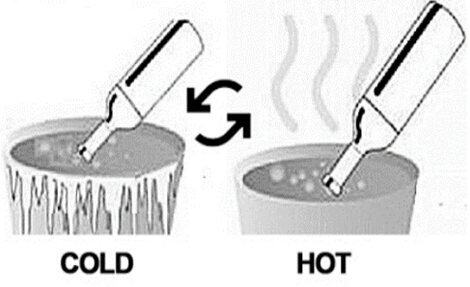
STEP 2: HEATING THE CUTTING LINE
Immerse the cutting line with water that is a little hot and rotate the bottle at a fast speed so as to give a uniform temperature to the glass. Holding the bottle, you should feet it hot in touch but not too hot to handle.
STEP3: COOLING THE CUTTING LINE
Put the bottle into cold water and rotate it. Then heat and cool the cutting line again for 2-3 times or more.
Repeat the heating and cooling for many times and the cutting line becomes a crack. The crack should continue completely around the bottle. You may hear audible “click” indicating that the uncracked portions along the etch are now cracking.
But remember don’t try to force them apart. Let the glass work itself free!
STEP 4: SMOOTH THE EDGE WITH POLISHING PAPER
To prevent chipping, rub the inside and outside edges lightly with a piece of the coarser polishing paper. Then use a small amount of powder on a flat, hard surface. Dip the edge of the glass in water and then place on the polishing surface. Start to grind in a circular motion as shown in sketch.
After a short time, the edge of the glass will become flat. Again, smooth the inside and outside edges with the polishing paper.

Also, bellowing are what you should notice:
1. Brush some light machine oil on cutting wheel prior to cutting.
2. The lighter the etch, the better the separation.
3. Do not cut over labels.
4. The glass cutting wheel should always be at a right angle to the glass surface.
5. Always wear eye protection while working with glass and remove the bottle cap before cutting.
Now, it’s time for your imagination. Just think about how to use it!